Alright So this was suppose to go up last week but due to assessments and personal plans i didnt have time to write up this posted without it being rushed and missing information. In this post i want to go over step by step how to create Collides for your 3D assets you may create for unreal and explain why this process is important.
Unreal calculates Collisions using a primary geometric shapes such as Boxes, Spheres and other Convex shapes. Concaved Shapes However are not supported as the physics engine requires more complex mathematical algorithms to calculate these kinds of collisions slowing down the render time.


To get around these limitations you can create your own collides by create your a set of simple collides from a variety of Convex shapes that when arranged together will form a multi pieced collider for a single mesh.
In this example ill be making a Collider for a Doorway

Once I've created the Doorway Model which we will call the Render Mesh , I need to figure out what parts i want to be solid what parts I want to move through. The Doorway is pretty easy but what we will have to do is break up the model into simple primitive shapes (Boxes, cylinders, Spheres). Shown in the example below.

After Modelling the Collider Pieces the next thing to ensure is that all of the Collider Pieces share the same origin point as the Render Mesh.
After marking the Origin point with the 3D cursor Select the Pieces that Make up the Collider for the Render Mesh and Press "Ctrl + Alt + Shift + C" To open up the Set Origin Menu. From the Menu Select Origin To Cursor and that should set each of the Collider Pieces origins to That which was marked out by the 3D Cursor.

Finally this will become Important during export but all the Pieces need to be positioned at 0,0,0 in Blenders 3D Workspace. To do this is very simple, with the Render Mesh and Collider Pieces selected simply Press "Alt + G" This will set all selected objects position to 0 on all Axis.
Unreal Collider System Overview
Creating Colliders for Assets in Unity3D is pretty much done for you so when changing over to Unreal I noticed quickly that things where very different when setting up collisions and rather more complex. Inside Unreal you have the option to create a variety of simple collides that Unreal can generate itself but these generated collides have there limitations.Unreal calculates Collisions using a primary geometric shapes such as Boxes, Spheres and other Convex shapes. Concaved Shapes However are not supported as the physics engine requires more complex mathematical algorithms to calculate these kinds of collisions slowing down the render time.
In this example ill be making a Collider for a Doorway
Once I've created the Doorway Model which we will call the Render Mesh , I need to figure out what parts i want to be solid what parts I want to move through. The Doorway is pretty easy but what we will have to do is break up the model into simple primitive shapes (Boxes, cylinders, Spheres). Shown in the example below.
Modelling the Collider
After analyzing the Render Mesh the next thing to do it model each piece to make up the collider, I will be using the first breakdown shown in the example.After Modelling the Collider Pieces the next thing to ensure is that all of the Collider Pieces share the same origin point as the Render Mesh.
Setting up the Origin Point
To set the origin point to the Render Meshes Origin In Blender first select the Render mesh in Object Mode and Press "Shift + S" to bring up thr Snap Menu. From the Menu select Cursor to Selection. This will move the 3D cursor to the Origin Point of the Render Mesh.After marking the Origin point with the 3D cursor Select the Pieces that Make up the Collider for the Render Mesh and Press "Ctrl + Alt + Shift + C" To open up the Set Origin Menu. From the Menu Select Origin To Cursor and that should set each of the Collider Pieces origins to That which was marked out by the 3D Cursor.
Finally this will become Important during export but all the Pieces need to be positioned at 0,0,0 in Blenders 3D Workspace. To do this is very simple, with the Render Mesh and Collider Pieces selected simply Press "Alt + G" This will set all selected objects position to 0 on all Axis.
Naming Convention
Before we export Unreal will need use to provide it with some information so it can determine what Objects it should use to Render and what objects it should use as the Render Mesh's Colliders.
To do this we need to Conform to a certain naming convention.
To do this we need to Conform to a certain naming convention.
The Render Mesh can be named anything you wish. In my example the Render Mesh is named "ShipBelowDeck_Door_00". Unreal will reconise this as the render mesh.
For the Next Three Pieces that Make up the Collider we will need to name it in accordance to the naming convertion Unreal uses. So unreal know these Objects will be Colliders we first need to use the Prefix "UCX_" Followed by the name of the Render Mesh "ShipBelowDeck_Door_00". Because we have 3 Objects that make up the Collider we then need to Specify what number piece it is. "_01".
For the Next Three Pieces that Make up the Collider we will need to name it in accordance to the naming convertion Unreal uses. So unreal know these Objects will be Colliders we first need to use the Prefix "UCX_" Followed by the name of the Render Mesh "ShipBelowDeck_Door_00". Because we have 3 Objects that make up the Collider we then need to Specify what number piece it is. "_01".
If named correctly the Object names should follow a similar convention to this:-
Render Mesh: ShipBelowDeck_Door_00
Collider Piece 1: UCX_ShipBelowDeck_Door_00_00
Collider Piece 2: UCX_ShipBelowDeck_Door_00_01
Collider Piece 2: UCX_ShipBelowDeck_Door_00_01
Collider Piece 3: UCX_ShipBelowDeck_Door_00_02
Side Note for those who are curious UCX stands for "UnrealColliderConvex". UCX may also be exchanged with UCB
Exporting
Finally After all that we are ready to export. Now After setting the Origin points to be the same you should have your model Centered in Blenders 3D work space this is importation as Blenders FBX exporter encoding is read differently by Unreal I'm not sure if this is just a bug or if its intended to work this way but it does make things rather cumbersome at times. So just make sure all the Objects are set to 0,0,0 on the 3D Viewport.
Before Exporting We are going to group our Render Mesh and Colliders together. This method can be used later down the Track when exporting multiple Assets in a Batch.
To create a Group Select All the Colliders and The Render Mesh and Press "Ctrl + G" and then Press "F6" to bring up the Group Parameters. Next name the group the same name as the Render Mesh and your done.

Now its time to export the Asset. With Nothing Selected go to File/Export/Autodesk FBX (.fbx). This will open the Export file navigation window. Find the Destiniton you would like to save the Model. Next Scroll down to the very bottom of the Left hand panel to reveal the FBX exporter settings.
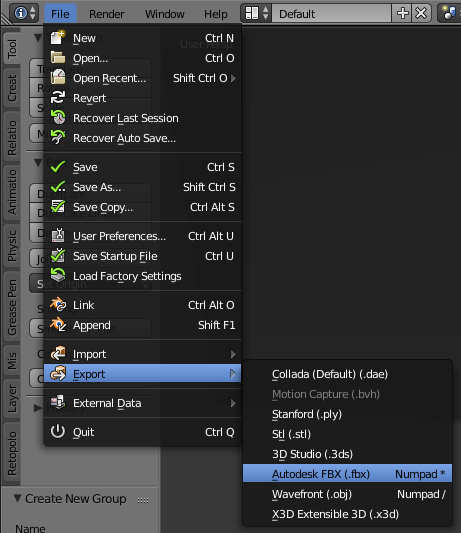

Untick "Baked Animation" and "Batch Own Dir" We wont need these and then Adjust the Scale if need be, For me i used a scale of "40", usually Objects use a scale of 10:1 from Blender to Unreal if using the Default Blender Units. Now to make it export the groups instead of Selected Objects. Change the Batch Mode to "Group" and your Done Press Export and it will export all Groups within the current scene.
Before Exporting We are going to group our Render Mesh and Colliders together. This method can be used later down the Track when exporting multiple Assets in a Batch.
To create a Group Select All the Colliders and The Render Mesh and Press "Ctrl + G" and then Press "F6" to bring up the Group Parameters. Next name the group the same name as the Render Mesh and your done.
Now its time to export the Asset. With Nothing Selected go to File/Export/Autodesk FBX (.fbx). This will open the Export file navigation window. Find the Destiniton you would like to save the Model. Next Scroll down to the very bottom of the Left hand panel to reveal the FBX exporter settings.
Untick "Baked Animation" and "Batch Own Dir" We wont need these and then Adjust the Scale if need be, For me i used a scale of "40", usually Objects use a scale of 10:1 from Blender to Unreal if using the Default Blender Units. Now to make it export the groups instead of Selected Objects. Change the Batch Mode to "Group" and your Done Press Export and it will export all Groups within the current scene.
No comments:
Post a Comment